Showing posts with label No Bake. Show all posts

Monday, January 14, 2013

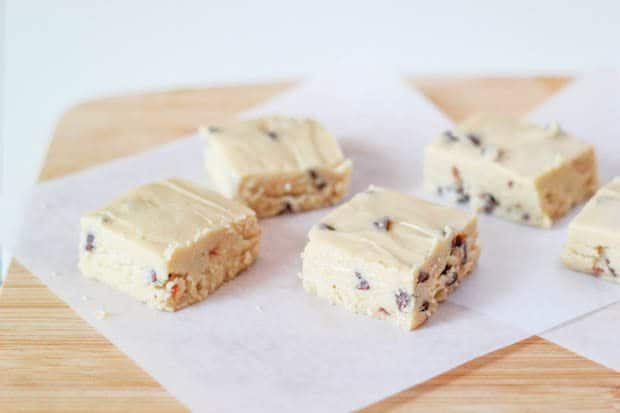
Chocolate Chip Cookie Dough Fudge

makes 36 fudge squares


For Cookie Dough
  • 1/3 cup unsalted butter, soften to room temperature
  • 1/4 cup sugar
  • 1/4 cup light brown sugar
  • 1/2 tsp vanilla extract
  • 1/8 tsp salt
  • 2 Tbsp half-and-half (or milk or cream)
  • 1/2 cup all-purpose flour
For Fudge
  • 1/3 cup light brown sugar
  • 1/3 cup unsalted butter
  • pinch of salt
  • 1/3 cup half-and-half (or milk or cream)
  • 4-5 cups confectioners’ sugar
  • 1 tsp vanilla extract
  • 1/2 cup mini semi-sweet chocolate chips
Line 8×8 square baking pan with aluminom foil or parchment paper. Set aside.
For the Cookie Dough, combine butter and sugars in the bowl of a stand or handheld mixer.  Beat on medium speed until light and fluffy.  Mix in vanilla, salt, and half-and-half.  Add flour and mix until just combined.  Do NOT overmix.
To prepare the fudge base, combine brown sugar, butter, salt, and half-and-half in a medium saucepan.  Stir over medium-low heat until butter is melted and brown sugar is dissolved.  Remove from heat. Slowly stir in powdered sugar, 1 cup at a time, until mixture is smooth and sugar is incorporated throughout.  Stir in vanilla.  Add more confectioners’ sugar if desired.  The more powdered sugar you add, the thicker, firmer, and sweeter the fudge will be. I used 5 cups.
Add cookie dough to the fudge base and stir to combine.  At this point, the mixture should have cooled to room temperature.  If not, continue to stir until it is no longer warm to the touch.  Fold in mini chocolate chips and spread fudge into prepared baking pan.  Chill until set, about 3-4 hours.  Cut into squares and enjoy!
*Fudge will keep for 1 week in the refrigerator.

Source: sallysbakingaddiction.com

Wednesday, August 31, 2011

Pajeon (Korean Scallions Pancake) Recipe

I have tried many times to cook this and finally I found just the right recipe for me.


Basic Ingredients:
2 heaping tbs flour
1/4 cup ice-cold water
1/4 tsp salt
1/2 tsp white pepper
1 large or extra-large egg, lightly beaten
1 chilli (remove the seeds, chop into very small pieces)
1 bunch of scallions
a spoonful of soy sauce
vegetable oil, for frying

Fillings:
you can choose any fillings you want, but last time I tried it I used
1/4 medium carrot
1 sausage

Steps:
1. Stir together the flour, pepper, salt and water until just mixed.
2. Chop the green parts of the scallions into 3-inch (10cm) lengths. Reserve the white parts for another use. Chop the other fillings at about the same size with scallions.
3. Heat a thin layer of vegetable oil in a 9 or 10-inch (23-26cm) non-stick skillet until hot. (you really want to use non-stick ones, cos the batter is very sticky). Fry the scallions until they’re completely cooked through and soft. Add a touch of soy sauce to the pan when they’re almost done, to season the scallions. Then add the chopped chilli.
4. If using other ingredients, any vegetables, kimchi, or prawns (in my case carrot and, sausages)- whatever you have, add them now, then toss a few times to heat them through.
5. Pour the pancake batter into skillet, spreading the batter, and cook a few minutes until the bottom is nice and brown underneath. you may want to press and keep pressing for faster result. Lift the edge to peek.
6. Pour the beaten egg on top then swirl the pan to even out the egg a bit, still keeping it pretty uneven. Distribute the dried pepper strands over the egg, if using, and cook until the egg is just beginning to firm near the edges.
7. Using a wide spatula, flip the pancake and cook for another minute or two until the egg is set and preferably crispy at the edges. (I tend it cook it pretty well, I like it really crispy though it is't “gourmet”, so use your judgment.)
5. Slide pancake onto a cutting board (or just on the plate), then cool to room temperature. Cut into six or eight wedges, and serve.

Dipping sauce:
Mix 3 parts soy sauce with 1-2 parts rice vinegar and a few drops of sesame oil. A bit of chilli oil can also be added.

I'd like to eat this delicious savoury dish with hot steamed rice and korean style grilled beef/pork but most of the times I just couldn't wait that long and eat them all at once so I usually double the recipe :D Enjoy!

Note: Photo is courtesy of davidlebovitz (his looks pretty close to mine, I was never able to get enough time to take pic ^-^ will change if I could take a pic of my own pajeon)

Loves,
Mochiposh

Simple Strawberry Mousse Dish

This one sounds really simple and look cute, so why not give them a try.


Step 1Ingredients

Not much here:

1 lt of milk
1 pack of strawberry milk gelatine
lots of natural strawberries (frozzen)

Step 2Procedure

Ok this is pretty easy, first heat up the milk until its really really hot, then add the gelatine mixture and mix it up perfectly.

Wait like 10 or 15 minutes so it wont be extremely hot, and pour it in the blender, and add LOTS i do MEAN LOTS (like 25 maybe) of frozzen strawberries and blend it up!!!

Since ur gelatine wasnt as hot anymore and u added frozzen strawberries, ur mixture should be just a little hot, now pour it in small dished and then put them in the fridge.

Step 3Tips

Ok the mousse is going to be a little mmmm watery?? sorry about my bad english, anyways its going to be a little soft, it tastes great like this BUT if u want it to be a little harder, just throw them in the freezer for about 30 mins to 1hr, depends on how hard u like it, BUT NEVER go OVER 1hr, it will get frozzen and it will be very hard and it will loose flavour, believe i did it with some dishes last night and no good.

Enjoy!!
 
Loves,
Mochiposh

4-Minute Chocolate Mousse

Okay, this one's Chef Ramsay's recipe so of course I need to keep it. Here it goes:


Ingredients
100g dark chocolate (70% cocoa solids) broken up into pieces -
300ml double cream
50g caster sugar
1 large egg white
chocolate shavings, to garnish
2 tbsp Amaretto or other liqueur (optional)

if you are not able to acquire pasteurized eggs, or are concerned about having an egg white in the recipe, try substituting in meringue powder!

From user HollyMeeker:

  • 2 teaspoons Wilton Meringue Powder
  • 2 tablespoons cold water
  • 1/4 cup super fine sugar (Use the recipe's suggestion to make the granulated sugar fine.)
In a large bowl, combine meringue powder, water and 1/4 cup minus 1 teaspoon of the sugar. Whip at high speed for 5 minutes. (A stand mixer makes this whole process much easier.)

Gradually add the rest of sugar and continue whipping at high speed for 5 minutes until meringue is stiff and dry. Makes the the equivalent of one egg white.

Use according to your recipe. Meringue powder can be used to replace egg whites in your recipe if egg white is beaten with sugar before adding to ingredients.

Just a note: Chefs say that using a copper bowl to beat egg whites will make them higher and lighter.

It's difficult to chronicle the order of events. Angry Chef recommends this step before the next, but I prefer them in reverse order. I'll let you make up your own mind about it.
  • Break the chocolate into small pieces and set aside.
  • In a small saucepan, heat half of the cream until it begins to boil
Note: this happens faster if you preheat the saucepan before adding the cream

  • Turn off the heat, add the chocolate pieces and stir until the chocolate has melted and the mixture is smooth.
  • Pour the mixture into a bowl set over a large bowl of iced water and add the rest of the cream and Amaretto, if using.
  • Using a hand-held electric whisk, beat the mixture to soft peaks. Remove the bowl from the iced water.
  • Separate egg white into a bowl
  • Whisk the egg white with a hand-held electric beater until stiff peak.
  • Add the sugar, a tablespoon at a time, and continue whisking to a soft meringue.
  • Carefully fold the meringue through the chocolate mixture, then spoon or pipe into chilled serving glasses.
  • Top with chocolate shavings or cookies or mint sprigs!
  • Try not to eat the whole thing at once or you may require a trip to hospital
With enough practice (and believe me, once you try this, you'll be more than willing to Try, Try Again!), I'm sure you can pare this process down to four minutes. But for the first time, maybe cut yourself a break and allow at least 10!

This is even better after chilling!

These looks good, must try this as soon as possible. Like right now lol..enjoy!

Loves,
Mochiposh

Deep Fried Oreos

This one is a good one, very funny. Instructibles again. (MyAngryPants)

Oreos. Mans greatest achievement. These wonderful snack cakes are enjoyable to everyone with a glass of milk. But man soon grows bored with his simple dessert. What else is there to do to an already amazing snack?! Fry it.
10 (or however many can quench your insatiable hunger) Regular Oreos
1 Bottle of Vegetable Oil
1* Box of Pancake Mix (Instead of pancake mix, you can just substitute your own pancake batter or even waffle batter)
1 Mixing bowl
1 Saucepan
Whip out your favorite dry pancake mix (or wet pancake mix, but I doubt that exists) and use your eyeballs to read the instructions on it. Use everything it tells you. Don't assume that "Oh nobody will know if I skimp out on using two eggs, and instead use this fake egg solution I found at the grocery store!" They will know.
When you are making your pancake batter, use more flour than it calls for, or less milk. You want the batter to be thicker than normal that way it clings to the oreos. I also threw in some vanilla extract and cinnamon for taste.
Pour in just enough oil to totally cover the Oreos and to give them room to move around without hitting bottom. Set your stove-top to medium-high (ours went to 10, and I had it on 7). Using a candy thermometer (or any thermometer, I won't tell anyone) check the temperature every few minutes. When that bad boy reaches 280 Fahrenheit (138 Celsius), your ready to fry!
Grab two or three Oreos and toss them in the pancake batter. Flip them about and make sure that no part of the Oreo is left uncovered. Make sure that you don't leave them in the batter for too long. Say the phone rings and you step away for a few seconds, that's okay. However, if your oil catches fire and you waste time trying to put it out, shame on you. Those Oreos could get soggy!
Now, this is where it gets difficult. Throw your battered Oreos into the molten oil and they should start floating around like little ghosts. Try not to put more than four or five in at a time because it gets very difficult to keep up with each one, and they may start plotting to destroy you.
Continuously splash hot oil on the top sides of the Oreos while they are cooking. This makes sure that they cook throughout (at least, in theory)
Watch the bottom of the Oreos. When they reach a rich, golden brown color, flip them over with your tool of choice.
Continue to watch your Oreos while still splashing them with oil. When the entire oreo is a dark golden brown, (emphasis on GOLDEN, not a dark brown) they are done. Pull them out and place them on a paper towel-topped plate. Give yourself a pat on the back, 'cause you just fried an oreo.
Let all your Oreos cool down before indulging. I say cool down, I just mean don't dig into them five seconds after taking them out of the hot oil. Shove as many in your face as physically possible. These things are like ambrosia. Call your friends, call your neighbors, call your lawyer, call your doctor, call the emergency room. Share these artery-clogging monsters with anyone you can, because I can promise you, you cannot eat them all.

**A note from the editor-
We tried frying other things while making this instructable:
Golden Oreos - As good as their chocolate counterparts.

Snickers - The chocolate melted but they are extremely tasty

Reeses Cups - The chocolate and penut butter melted and mixed together to make a delicious concoction.

Butterfingers - Terrible idea. The insides of the Butterfinger caramelized to create a sticky, hard mess.

Raw Pancake Batter - Turned out sort of like a funnel cake. Very good.

Enjoy! (And thanks MrAngryPants)
 
Loves,
Mochiposh

Oreo Truffles

My favourite biscuit + choc = heaven (the fat version, but I don't care :p)


Ingredients
1. One 8oz package softened cream cheese
2. One 16 oz package Oreos
3. 12 oz of bittersweet baking chocolate

Other items
1. Cookie sheet
2. Waxed paper
3. Microwave safe bowl
4. Large mixing bowl
5. Wooden spoon
6. Two forks

Yield: About 30 truffles
(1) Take all of the Oreos out of the package and crush them into fine crumbs. Include the cookie and the cream filling.

Place the cookies into a gallon sized Ziplock bag, using a rolling pin to crush them.  You may also use a food processor on low speed.

(2) Pour crumbs into a large mixing bowl.
(3) Take out 1/4 cup of the crumbs and set aside for later.

(4) Place the softened cream cheese into the mixing bowl with the Oreos and use a wooden spoon to mix it until creamy.

(5) With your hands, take bite-sized pieces of the mixture and roll into a small ball. Place each ball on a waxed paper lined cookie sheet.

(6) When all the balls have been formed, place the cookie sheet into the freezer for about 45 minutes or until the balls have hardened.
(7) After the truffles have hardened, break up the chocolate squares, place in a microwave safe bowl, and melt according to package instructions.

Generally this is on low power for 30 seconds at a time, stirring often.
(8) After the chocolate has been melted, place one or two truffles into the bowl at  a time.

(9) Roll the balls around until they are completely covered in chocolate.

(10) Using two forks, remove one truffle at a time and replace it onto the waxed paper lined cookie sheet.

(11) Immediately sprinkle some of the remaining Oreo crumbs onto the wet chocolate.

(12) When all of the balls have been covered in chocolate and Oreo crumbs, place the cookie sheet back in the freezer for 5-10 more minutes, or until the chocolate has hardened.

(13) Remove the truffles from the cookie sheet and display on a plate for everyone to enjoy.

(Or you may want to hide them, because they tend to disappear quickly.)
These look extremely fun and yum. Love it. Will give it a try.
 
Loves,
Mochiposh